
In recent years, blogging has emerged as a significant source of income for numerous individuals worldwide. It has demonstrated that dedicating oneself to a hobby can generate substantial monthly earnings when approached correctly.
Blogging has become one of the most reliable methods to make money online, attracting those who aspire to follow in the footsteps of successful bloggers. Additionally, it offers the opportunity to connect with people globally and share personal thoughts and ideas. If you are intrigued by the prospect of starting a WordPress blog and entering the world of blogging, this comprehensive guide will provide you with everything you need to know to get started and embark on your blogging journey.
Whatever the case may be – starting a WordPress blog is a great idea!
In this article, I will guide you through the step-by-step process of starting a blog, ensuring that you can follow along regardless of your experience level. I understand that initiating a WordPress blog can be challenging, particularly if you’re not technically inclined. However, rest assured that you are not alone in this journey.
Having assisted numerous beginners like yourself, I have developed a simplified guide that enables you to set up a professional WordPress blog in 30 minutes or less. This guide is designed to be easy to follow, even if you have no prior knowledge of WordPress.
So, if you’re ready to learn how to start a blog, let’s begin this exciting journey together!
4 Frequent Questions People Ask About Starting A Blog
As you gear up to build your WordPress blog, it’s natural to have a few questions swirling in your mind. Rest assured, this is completely normal!
In fact, many beginners in the blogging world have common questions that arise. That’s why I’m here to provide you with upfront answers, ensuring that you know exactly what to expect from this process. By addressing these questions early on, you’ll feel more confident and well-prepared as you embark on your blogging journey. So, let’s dive in and address those initial queries you may have!
1. How long does it take to start a blog?
Determining a blog topic can be a creative process that varies in duration for each individual. However, once you have clarity on the subject you want to write about, the technical process of starting a blog can be accomplished in just 20-30 minutes. You’ll be pleasantly surprised to discover that it’s easier than you might initially think. With the right guidance and resources, setting up your blog becomes a straightforward and efficient task.
2. Is it expensive to start a blog?
No, starting a blog using the method I recommend is not entirely free. However, you can begin your blogging journey for approximately $80, covering the expenses for the entire first year. This cost averages to less than $7 per month, making it an affordable investment to establish and maintain your blog.
3. Can’t I just use one of those free platforms to start a blog?
While free platforms can be suitable for hobby blogs, it’s important to recognize their limitations. With free platforms, you have minimal to no control over your blog, and there is a risk of losing your content if the platform shuts down. In contrast, the method I am about to introduce provides you with maximum control over your blog, safeguards your content, and is highly advantageous if you have aspirations of monetizing your blog. By following this method, you’ll have the freedom to customize your blog to your liking and maximize its potential for generating income.
4. Do I need to be one of those tech geniuses from TV to start a blog?
Absolutely! You don’t need any special knowledge or expertise to start your own blog. As long as you feel comfortable using a computer and browsing the internet, you have everything you need to get started. The process is designed to be user-friendly and accessible to beginners. So, don’t worry if you’re not a tech whiz – anyone can start their own blog with ease.
Easy Steps On How To Start A Blog
STEP 1- Pick What You Would like To Blog Around:
When contemplating starting a blog, one of the most crucial aspects to consider is choosing your niche. Instead of following the crowd and getting lost in the sea of similar blogs, it is essential to focus on a niche topic that you are genuinely passionate and knowledgeable about.
Starting a blog in a niche where you have expertise allows you to offer valuable and unique insights. Rather than following the herd, opt for a category that has a substantial market but is relatively untapped. By doing so, you position yourself as a standout voice in that specific area, attracting an audience seeking fresh perspectives and information. This approach increases your chances of success and sets you apart from the competition.
STEP 2- Pick A Blogging Platform:
When it comes to starting a blog, you have the option to choose between a free blogging system or a self-hosted WordPress platform.
While the appeal of something being free can capture everyone’s attention, it’s important to be aware of the drawbacks that often come with it. Using a free platform may initially seem enticing, but it can lead to significant limitations and challenges in the long run, as I mentioned earlier.
When considering starting a blog, it is best to avoid using free platforms altogether. Opting for a self-hosted WordPress blog is a more recommended choice. There are numerous reputable web hosting companies available, and I can suggest the best and most affordable option that I currently use to host all my websites. This ensures that you have more control, flexibility, and reliability for your blog.
STEP 3- Select A Site Name For Your Blog And Get Hosting
Web hosting is the place where your website resides on the internet. It can be thought of as your website’s home in the digital realm. Every website, regardless of its purpose or size, requires web hosting to be accessible to visitors. Web hosting ensures that your website is stored on servers connected to the internet, allowing users to access it at any time. Just as a physical house provides a space for you to live in, web hosting provides the necessary infrastructure for your website to exist and be available to online users.
STEP 4- Get A Domain Name For Your Website:
When starting a WordPress blog, the first step is to choose the domain name you will use. Selecting the perfect domain name is crucial for several reasons. It affects how easily people can remember your website, how simple it is to type the name, and how relevant it is to the content you plan to blog about.
When deciding on a domain name, consider choosing something memorable, easy to type, and relevant to your blog’s topic or niche. A well-chosen domain name can enhance your brand identity and make it easier for visitors to find and remember your blog. Take the time to brainstorm and select a domain name that aligns with your blog’s purpose and resonates with your target audience.
STEP 5- Install WordPress On Your Website:
Once you have obtained your self-hosted WordPress hosting and domain name, the next step is to log in to your server account to set up WordPress with just a single click. In this process, I will guide you through each step accompanied by pictures and illustrations to ensure clarity and ease of understanding. So, let’s dive right in and get started with the installation process of WordPress on your server account.
Your 5-minute guide for how to start a blog today
In this comprehensive guide, you will delve into the details of each topic mentioned. However, before we dive into the specifics, let’s take a high-level overview of the technical steps required to launch a blog.
In addition to the creative process of deciding what to blog about, here are the essential steps you’ll need to follow to get your blog online in approximately 20-30 minutes:
1. Choose a blogging platform.
2. Select a domain name for your blog.
3. Acquire web hosting for your blog.
4. Install and set up WordPress on your hosting account.
5. Customize the appearance of your blog with a theme.
6. Install essential plugins to enhance functionality.
7. Create essential pages, such as the About and Contact pages.
8. Craft your first blog post and publish it.
By following these steps, you can have your blog up and running within a relatively short timeframe. The subsequent sections of this guide will provide you with detailed instructions and insights to accomplish each step successfully.
Step 1: Choose a topic – is your WordPress blog for fun or money?
If you’re blogging purely for enjoyment, you can skip this section as choosing a topic becomes quite simple: it’s whatever interests you!
However, if your goal is to monetize your blog, things can become a bit more complex. What you enjoy writing about the most may not necessarily be the topic that brings in revenue.
Since changing your blog’s topic can be challenging down the line, it’s essential to invest effort in determining whether there is an audience and potential monetization options for your chosen topic before building your blog. Consider answering the following three questions:
1. Is there a demand or audience for the topic you want to blog about?
2. Are there viable monetization options available for that particular topic?
3. Can you see yourself consistently creating content and engaging with the audience in that niche?
By answering these questions honestly and thoroughly, you can gain valuable insights and make an informed decision about your blog’s topic, ensuring that it aligns with your goals for monetization.
1. Do I enjoy writing about this topic?
There’s no denying the fact that building a successful blog requires time and effort. The technical aspect of launching a blog is relatively straightforward, but transforming it into a platform that attracts regular visitors takes time and dedication.
For this reason, it’s crucial to choose a topic that you can envision yourself writing about for the long term. While you may have a passing interest in a particular topic today, consider whether you will still be enthusiastic about writing posts on that topic in the coming months, even if your blog isn’t experiencing a surge in traffic.
Passion plays a significant role in consistently publishing new and engaging content. If you lack passion for the chosen topic, you will face an uphill battle in maintaining a consistent posting schedule. Therefore, it’s essential to select a subject that genuinely excites and motivates you, ensuring that you can sustain your commitment to your blog over the long haul.
2. Are other people interested in this topic, too?
Once you have identified a topic that you are confident will ignite your passion for the foreseeable future, the next question to consider is:
“Are there other people who share the same level of passion for this topic?”
The answer to this question is crucial, as building an audience for your blog becomes easier if you know there is existing interest in your chosen topic.
Fortunately, you don’t need to possess mind-reading abilities to determine this. There are useful and free internet sleuthing tools available to help you assess the level of audience interest. These tools can provide insights into various aspects, such as search volume, social media discussions, and online communities related to your topic.
By utilizing these tools, you can gather valuable information to gauge the potential audience size and engagement for your chosen topic. This research will guide you in making an informed decision and enable you to tailor your content to resonate with the target audience from the very beginning of your blogging journey.
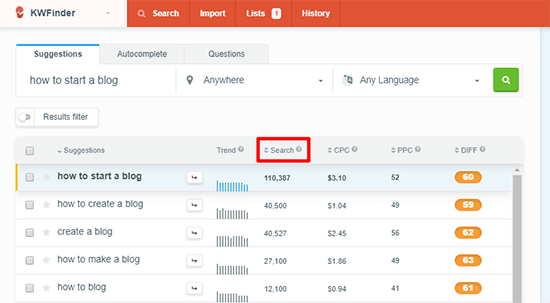
KWFinder – One helpful free tool for assessing audience interest is a keyword research tool. This tool allows you to enter a keyword related to your topic and provides insights into its popularity. A keyword can be any phrase that people search for in Google. If there is a significant number of searches for your topic, it indicates a good-sized audience.
To use the tool, think of words or phrases that best describe your topic, enter them in the provided box, and click “Find keywords.” The tool will generate a list of results, along with the corresponding number of monthly searches for each term. Ideally, you would like to see numbers with thousands of monthly searches. For instance, in the example given, the topic of this post (which is a popular topic) receives over 110,000 searches per month.
By using this tool, you can gain insights into the search volume and popularity of your topic. It helps you gauge the level of interest among potential readers and ensures that there is a substantial audience to engage with your content.
Since your blog may cover multiple potential keywords and topics, it is a wise idea to repeat the keyword research process for each of them. By doing so, you can assess the level of interest and search volume for various topics that your blog might cover.
This helps you understand the potential audience size and popularity of each topic, allowing you to make informed decisions about the content you create and the direction you take with your blog. Conducting keyword research for different topics ensures that you are targeting topics that resonate with your audience and have the potential to attract significant traffic to your blog.
Facebook Groups – Facebook can be a valuable platform to gauge the interest in your chosen topic. One effective method is to search for relevant Facebook Groups that cover a similar topic and assess the number of active members they have.
If you come across Facebook Groups with thousands of members, it’s a positive indicator that your topic has an engaged and interested audience. Large group membership suggests that there is a community of individuals passionate about the subject matter, creating opportunities for engagement and potential readership for your blog.
By exploring Facebook Groups related to your topic, you can gain insights into the level of activity, discussions, and overall engagement. This information further validates the potential interest in your chosen topic, helping you make informed decisions about the direction of your blog and the audience you can target.
Google Trends – There is a user-friendly tool available that allows you to quickly determine whether interest in your chosen topic is increasing or decreasing over time. This tool simplifies the process and provides valuable insights for your decision-making.
By utilizing this tool, you can track the trends and changes in interest for your topic. Ideally, you would want to see an upward trend indicating increasing interest, as this suggests a growing audience and potential opportunities for your blog.
Monitoring the interest level in your chosen topic helps you stay updated on the market dynamics, identify emerging trends, and align your content strategy accordingly. It enables you to adapt and cater to the evolving interests and preferences of your audience, enhancing the long-term success of your blog.
3. Can I make money from this topic?
When it comes to monetizing a blog, certain topics are more conducive to generating revenue than others, although it is possible to monetize most topics with creativity and strategy.
For instance, if you had a popular blog focusing on strategies for using credit cards effectively, you would likely attract attention from credit card companies interested in advertising and collaborating with you.
If your goal is to make money from your blog, it’s important to consider questions such as:
1. Are there companies that would be interested in paying for exposure to your audience?
2. Do other blogs covering the same topic seem to find monetization opportunities?
3. Could you create your own product in the future, like an eBook, that would appeal to your audience and generate sales?
By exploring potential advertising partnerships, affiliate programs, sponsored content opportunities, and the development of your own products, you can unlock various monetization avenues. Additionally, researching successful blogs within your niche can provide valuable insights into potential revenue streams and help you identify effective strategies for monetizing your own blog.
Step 2: Pick a blogging platform – I recommend WordPress
If you’re considering starting a blog, there’s one blogging platform that I highly recommend: self-hosted WordPress.
WordPress not only powers the blog you’re currently reading but also serves as the backbone for an astounding 33% of all websites on the internet. That’s right! More than one-fourth of every website you encounter is powered by WordPress.
Whether or not you’re familiar with WordPress, it’s highly likely that you’ve visited a website that runs on this platform at some point in your online journey. Its widespread usage is a testament to its reliability, flexibility, and extensive features that cater to the needs of bloggers and website owners alike. Choosing self-hosted WordPress provides you with a robust and trusted platform to build and grow your blog with confidence.
Why is WordPress the best platform to start a blog?
If you’re not convinced by WordPress’s impressive market share, here are some tangible reasons why it is the best platform to start your blog:
1. User-friendly: WordPress is designed to be user-friendly, allowing even non-technical individuals to easily publish blog posts and manage their content.
2. Strong Community: With its widespread popularity, WordPress boasts a vast and supportive community. If you encounter any issues or have questions, you can easily find assistance and guidance from fellow WordPress users and experts.
3. Flexible Customization: WordPress offers a wide range of themes and plugins that make it incredibly easy to change the appearance and functionality of your blog. You can personalize your blog’s look and features without requiring any special technical knowledge.
4. Constant Development: WordPress is continuously evolving, with regular updates and improvements to enhance its performance, security, and functionality. You can benefit from the advancements and stay up-to-date with the latest features and trends in the blogging world.
By choosing WordPress as your blogging platform, you gain access to a user-friendly interface, a supportive community, and the flexibility to customize your blog to your heart’s content.
You shouldn’t use WordPress.com, though
The distinction between the two versions of WordPress can be confusing, but it’s important to understand the differences:
1. WordPress.org: This is the version I recommend. It is a non-profit, open-source software developed by a large community. With WordPress.org, you have the freedom to create a self-hosted WordPress blog. You install the free WordPress software on your own web host, giving you complete control over your website. While it requires a bit more setup, the benefits are well worth it.
Advantages of WordPress.org:
– Full control: You have complete ownership and control over your blog.
– Customization: You can easily customize your website with a wide range of plugins and themes.
– Monetization options: You can monetize your blog however you wish, without restrictions.
2. WordPress.com: This is a for-profit service built on the open-source WordPress.org software. While WordPress.com offers a basic blog creation option for free, there are limitations to consider:
Disadvantages of WordPress.com:
– Limited control: You don’t have full control of your website, meaning you don’t entirely own your blog.
– Restricted customization: Access to plugins and themes is limited unless you pay for an expensive business plan.
– Monetization restrictions: WordPress.com imposes restrictions on how you can monetize your site.
In summary, if you are serious about your blog and want full ownership, control, customization capabilities, and monetization flexibility, choosing self-hosted WordPress with WordPress.org is the better option compared to using WordPress.com, even with the offer of a “free” (but limited) blog.
Step 3: Register a domain name
Now that we have covered the topic selection and blogging platform, let’s delve into the technical details of creating a blog, starting with one of the most crucial elements:
Your domain name.
A domain name serves two fundamental purposes:
1. Permanent Address: Your domain name acts as your blog’s permanent address on the internet. Once everything is set up, anyone can simply type your domain name into their browser’s address bar and access your site from anywhere in the world. It’s like the physical address of your blog in the digital world.
2. Brand Identity: Your domain name represents your blog’s brand. In most cases, your domain name will be the same as your blog’s name, making it a critical branding decision. Choosing a domain name that aligns with your blog’s purpose, niche, and overall brand image is important for establishing a strong online presence and creating a memorable identity for your blog.
Consider your domain name as the foundation of your blog’s online presence, serving as both its address and brand identity. Take the time to select a domain name that reflects your blog’s essence and resonates with your target audience.
What makes for a good domain name?
When choosing a domain name for your blog, there is a certain degree of personal choice and branding involved. While some popular websites like Google and Facebook have unique names that don’t follow a specific formula, it’s still helpful to consider some guidelines:
1. Relevance: Opt for a name that has a connection to your blog’s topic. This helps visitors quickly understand what your website is about and creates a sense of relevance.
2. Brandability: Select a name that is easy to brand. A memorable and distinctive name makes it easier for people to remember and associate with your blog.
3. Avoid Hyphens and Numbers: It is advisable to avoid using hyphens or numbers in your domain name. These can make it harder for people to remember and type correctly.
4. Prefer .com: If possible, choose a domain name with a .com extension. Although other domain extensions are gaining popularity, .com is still widely recognized and considered the standard. However, if you find a compelling domain name using a different extension, it’s acceptable to deviate from this guideline.
While these guidelines can be helpful, remember that successful websites exist outside of these rules. Ultimately, the choice of your domain name should align with your brand, reflect your blog’s purpose, and resonate with your target audience.
How to find domain names that are available
Here’s the tricky part about domain names:
Each domain name can only be owned by one person at a time, ensuring order and clarity on the Internet. For instance, if anyone could own a popular domain name like Facebook.com, it would lead to chaos.
To purchase a domain name, you must find one that is currently “available,” meaning it is not owned by anyone else. While finding an available domain name can be challenging, there are several tools available to simplify the process.
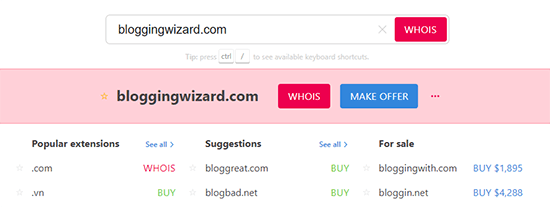
One such tool is Instant Domain Search, which allows you to quickly check the availability of a domain name. By entering your desired domain name into the tool, it will inform you whether the name is available or already taken.
Using tools like Instant Domain Search can help streamline your search for an available domain name and assist you in finding the right one for your blog. Remember to explore different options and variations to increase your chances of finding a suitable domain name that aligns with your blog’s purpose and branding.
If you’re facing difficulty finding available domain names, another helpful resource to explore is a blog name generator. These tools generate a list of relevant domain names that are guaranteed to be available for registration. By simply entering a word or keyword related to your blog’s topic, these generators will provide you with a variety of options to choose from.
Blog name generators take the guesswork out of finding an available domain name and offer creative suggestions based on your input. They can help inspire new ideas and provide alternative options that align with your blog’s niche.
Utilizing a blog name generator can save you time and effort in the search for an available domain name, allowing you to focus on finding the perfect name for your blog. Explore different generators and experiment with various keywords to discover unique and memorable domain names for your online presence.
How to purchase your chosen domain name
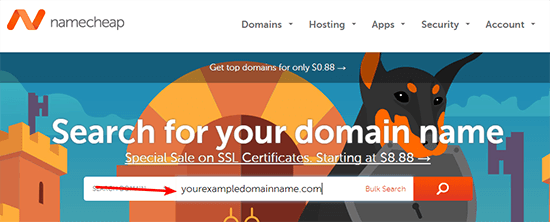
Once you have identified an available domain name that you like, it’s time to purchase it. While some web hosts offer domain registration services, I recommend using a separate service like Namecheap for a couple of reasons:
1. Enhanced Security: Registering your domain name separately from your web host adds an extra layer of security. By keeping your domain and web hosting separate, you mitigate the risk of a single point of failure. If someone gains unauthorized access to your domain, they won’t have control over your entire website.
2. Affordability: Namecheap is a reliable and affordable domain registrar. They offer domain registrations at approximately $10 per year for a .com domain, whereas some web hosts may raise the price, even if they initially provide a “free” year.
3. Convenience: Registering your domain with Namecheap provides you with convenient control over your domain name. If you ever need to make changes or manage your domain settings in the future, you can easily access and modify them through the Namecheap platform.
By opting for a separate domain registration service like Namecheap, you ensure better security, affordability, and control over your domain name. This approach also facilitates smoother transitions if you decide to change web hosts or make any modifications to your website in the future.
Here’s how to buy your domain name:
- Click Here To Go to Namecheap.
- Enter your chosen domain name in the search box.
- Click the button to add it to your cart.
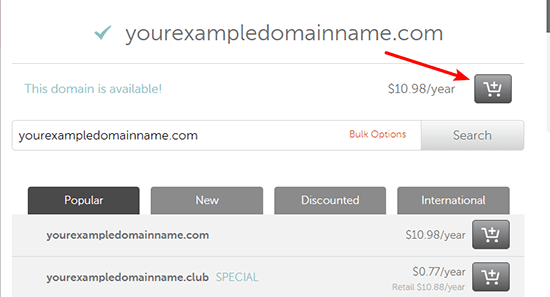
- Click Checkout to access your cart.
- Click the Auto-Renew to ensure your domain + privacy renews automatically each year.
- Click Confirm Order and complete the checkout process.
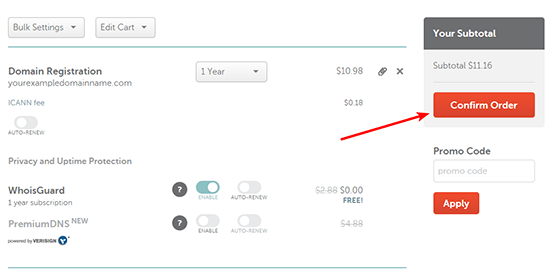
Once you pay, you now officially own your own domain name! Now, all you need to do is hook it up to some web hosting.
Step 4: Purchase web hosting at Hostinger
Web hosting plays a crucial role in powering your website. While a domain name serves as the permanent address to your website, web hosting is responsible for making your website accessible on the internet. It can be compared to the engine of a car – without it, your website won’t function.
Web hosting provides the necessary infrastructure and resources to store and serve your website’s files, ensuring that when visitors access your domain name, they are greeted with your actual website. It serves as the house of your website on the internet, providing the necessary storage, computing power, and network connectivity for your website to function properly.
Just as every car needs an engine to move, every website requires web hosting to operate. It’s an essential component that allows your website to be accessible to visitors worldwide. Choosing a reliable and suitable web hosting provider is crucial to ensure the performance, security, and stability of your website.
Why Hostinger is the best host for new bloggers
Fortunately, finding reliable web hosting doesn’t have to be expensive. Hostinger is a recommended service that offers an excellent web hosting service at an affordable price, starting at just $2.99 per month.
There are several reasons why Hostinger is a great choice for new bloggers:
1. Affordability: Hostinger provides budget-friendly hosting plans, making it accessible for those starting out on a tight budget.
2. Excellent Support: Hostinger offers reliable customer support, ensuring that you have assistance whenever you need it. Their support team is knowledgeable and ready to help with any queries or technical issues you may encounter.
3. Solid Performance: Hostinger’s hosting infrastructure is designed to deliver reliable performance, ensuring that your blog is always available to visitors and loads quickly. This is important for providing a positive user experience and improving your blog’s search engine rankings.
4. WordPress Pre-installed: Hostinger simplifies the setup process by providing pre-installed WordPress on your hosting account. This saves you time and effort in getting your WordPress blog up and running.
By choosing Hostinger as your web hosting provider, you can enjoy affordability, reliable support, solid performance, and the convenience of having WordPress pre-installed. These factors contribute to a smooth blogging experience and help you establish a strong online presence.
STEP 1- How to purchase hosting at Hostinger
Click here to go to Hostinger’s official website.
Let’s go ahead and purchase your domain + hosting.
I suggest you follow along with this guide and purchase your hosting plan and domain name as outlined here. Note: This guide is detailed, so grab a cup of coffee, and follow along closely and carefully!
Before we begin, here are a couple of things you need to have in preparation:
1. Domain Name
A domain name is like your online address. This is where your blog/website lives.
You will get one free domain name with Hostinger valued at $9.99, or you can use any of your existing domain names if you already have one purchased. (Even if you don’t need the free domain name now, you can use it later.)
If you are on a small budget, you can make use of the free domain name offered by Hostinger. But I already told you the disadvantage of using a free domain name. I will explain how to connect your domain name to your web hosting account if you purchase it on Namecheap.
How to connect your domain name with your web hosting
To connect your domain name with your web hosting, you just need to complete these steps:
You need to change the nameservers at your domain registrar to:
- ns1.dns-parking.com
- ns2.dns-parking.com
- Go to Namecheap
- Follow this guide to use CustomDNS at Namecheap
The guide lays it out – but you’ll basically need to point your domain’s CustomDNS towards your Hostinger nameservers.
I know this process is a bit technical, but putting in a little time now will make things a lot easier further down the line.
If you ever run into any problems, you can talk to Hostinger’s support for more help. That’s one of the reasons I recommend Hostinger for beginners – their support is friendly, always available, and willing to go the extra mile!
2. Selecting Your Hosting Plan And Making Payment
When purchasing your web hosting and domain, you can make payment via credit card, debit card, or PayPal. Be sure to have your payment mode on hand.
I recommend that you go with the premium plan. This is perfect for you.
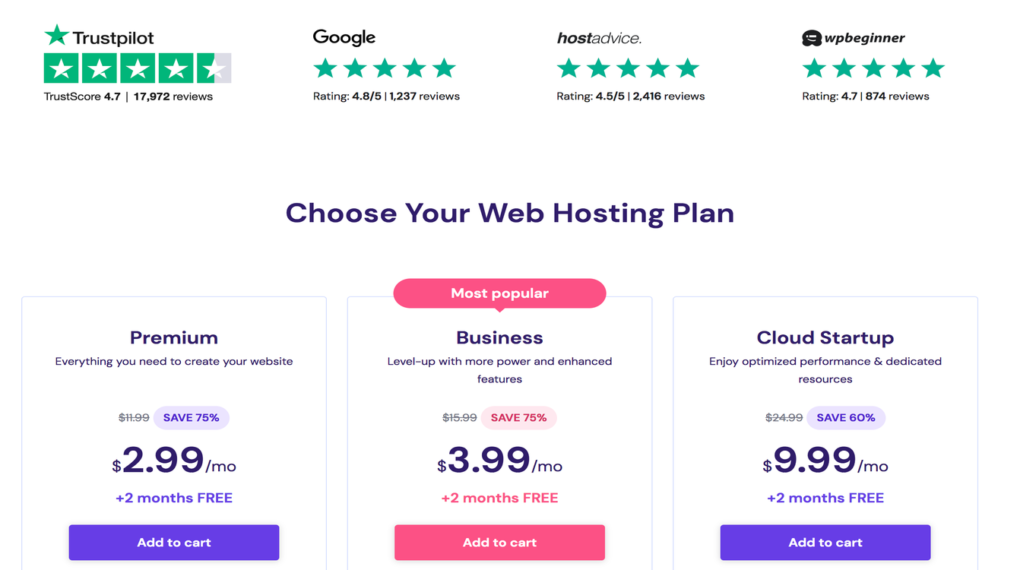
Click on Add to cart and you will be redirected to a page where you are to make your payment. If everything looks right, your purchase would be successful.
That’s it! Congratulations! You have just purchased your web hosting package and domain name. WordPress has also been installed on your domain name.
Your WordPress login URL will look like this:
Click on the WordPress login link to login to your dashboard.
Now we’re ready to customize your site’s appearance and start blogging.
Step 2. Selecting your WordPress Theme (how your blog looks)
A WordPress theme is responsible for determining the look and, to some extent, the functionality of your blog. It serves as the clothing for your website. Similar to how you wouldn’t go out in public without clothes, your WordPress blog needs a theme to function properly.
By default, your blog will have a pre-installed theme, but most bloggers prefer to choose their own theme to personalize their website. The good news is that there is a wide variety of free and premium themes available for WordPress due to its popularity.
Here are some of the best places to find WordPress themes:
1. WordPress.org: The official WordPress theme directory offers thousands of free themes that you can easily browse and install for your blog.
2. ThemeForest: This platform provides a great selection of premium themes. Over the years, I’ve personally used several of their themes and found them to be of high quality.
While some may suggest that premium themes are always superior to free themes, it’s not necessarily the case. Premium themes often offer better designs and additional features, but it’s not a universal rule. If you have a limited budget, feel free to start with one of the free themes available on WordPress.org.
The visual appearance of your WordPress blog will be determined by the theme you choose. When you first visit your blog, it will have a default appearance. However, by selecting and customizing a theme, you can transform your blog into a unique and visually appealing website that represents your brand and style.
When you first visit your blog, it will look something like this:
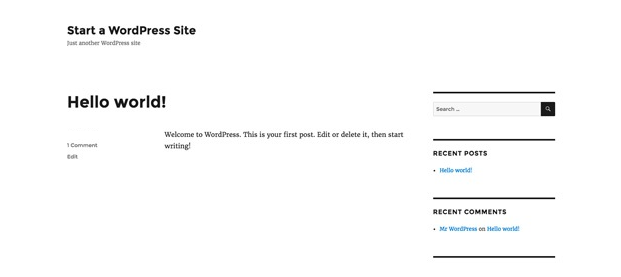
This is not very appealing to most people.
Customizing the look and feel of your blog is by far one of the most exciting and rewarding part in the journey of creating your WordPress site.
There are thousands of pre-made WordPress themes that you can install on your site. Some of them are free, while others are paid. If you want a premium theme for your blog, head over to themeforest.net
You can change your theme by going to your WordPress dashboard and clicking on Appearance » Themes.
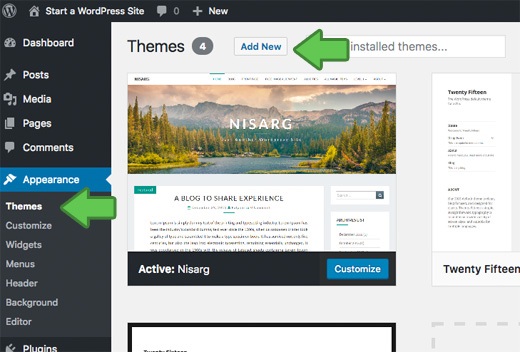
Go ahead and click on the Add New button.
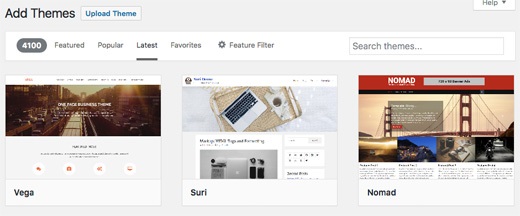
On the next screen, you will able to search from the 4100 free WordPress themes that are available in the official WordPress.org themes directory. You can sort by popular, latest, featured, as well as other feature filters (i.e industry, layout, etc).
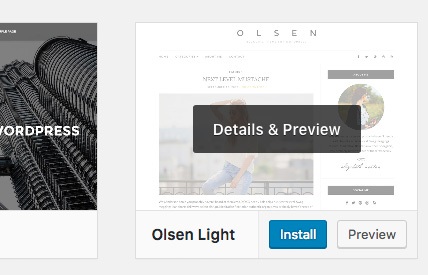
When you have found the theme that you like, simply bring your mouse on it, and it will show the Install button. Click on it and wait for the theme to be installed. After that, the install button will be replaced with an Activate button. You need to click on it to Activate the theme.
Once you have installed your theme, you can customize it by clicking on the Customize link under the Appearance menu.
- For free themes you found at WordPress.org, search for the theme by name and click Install
- For premium themes, click Upload Theme and upload the ZIP file of your theme
-
Step 3. How To Customize Your Theme To Make it Your Own
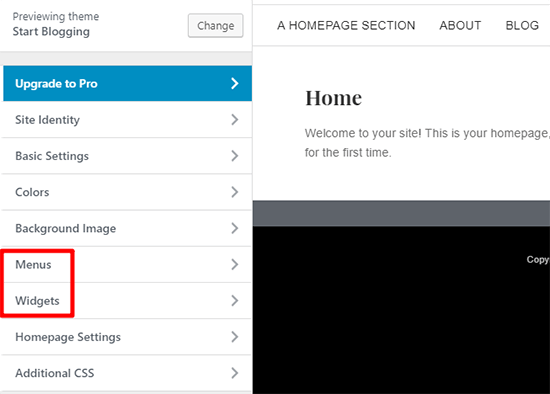
- Menus – Let you set up your site’s navigation menu so people can easily find their way around your blog.
- Widgets – Let you add cool functionality to your blog’s sidebar, like a list of your latest blog posts.
-
Step 4. Creating Your First Blog Post
And now for the super fun part of starting your WordPress blog – you’re finally ready to write your first blog post and share your thoughts with the world!
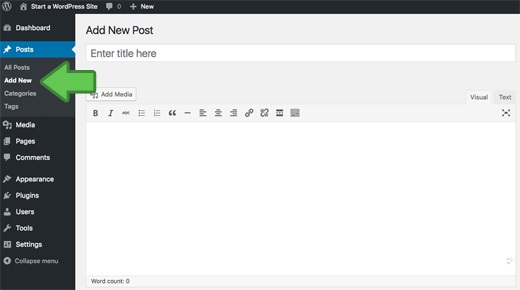
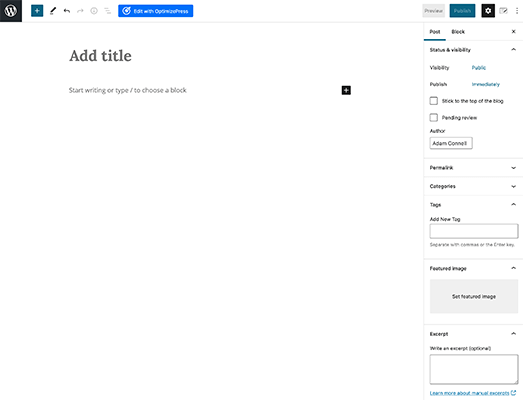
- To write your first blog post, click on the Posts » Add New menu in your WordPress dashboard.You will see an editor area where you can write your first blog post.
 Once you’re done writing, go ahead and click on the Publish button on the right to publish your first blog post to the world.
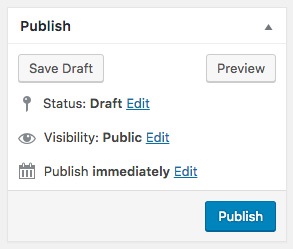 On the posts screen, you will notice several other sections such as Categories and Tags. You can use these to organize your blog posts.First, head to Posts → Add New. Then:
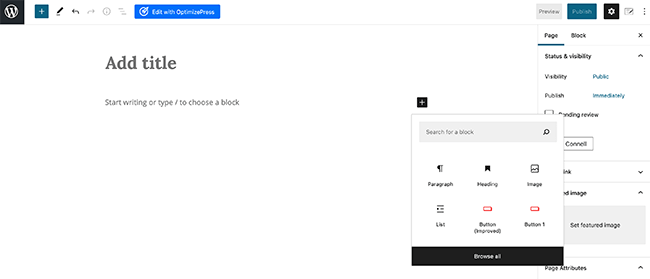
- Enter your blog post title at the top.
- Enter your blog post text using Gutenberg blocks. You can start typing immediately or paste in your content and it will automatically convert into Gutenberg blocks.
- If you need specific styled blocks such as button, bullet points or images, click on the plus sign which will bring up multiple options.
- Choose a category or add a new one on the right.
- Optional – add some tags that describe your blog post on the right.
- Click Publish when you’re finished.
Congrats! You just wrote your first blog post.
-
Step 5. Plugins & Customizations (how your blog functions)
-
Once you activate your chosen theme, you can take things a step further and actually customize it to make it your own! Most themes now support something called the Customizer. With the Customizer, you can modify your theme using simple options in a live sandbox. That is, you’ll be able to see the changes to your blog in real-time, but those changes won’t be made live until you Publish them. To access this area, go to Appearance → Customize in your WordPress dashboard:
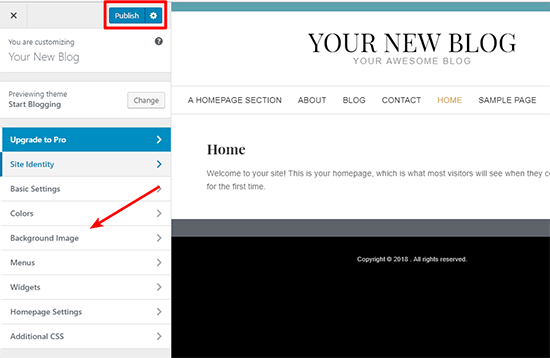
Feel free to play around and get creative with all the available settings because you can’t break anything!
Two areas that you’ll especially want to pay attention to are the Widgets and Menus:
-
- Whereas themes are mostly about appearance, plugins are all about functionality. They let you add pretty much anything, from a simple contact form to an entire eCommerce store!And, unlike themes, you can use as many plugins as you want (though you should try to only use plugins you absolutely need).You can find both free and premium plugins for your site.Here are some good places to look to get you started:
- WordPress.org – This houses the official free plugin directory with over 50,000 different plugins to choose from.
- Code Canyon – A popular marketplace for premium WordPress plugins.
- Once you have written your first blog post, you probably want to get started with adding other usual elements on your website such as a contact form, about page, and more.To further customize WordPress and add features like contact forms, galleries, sliders, etc, you need to use WordPress plugins.WordPress plugins are apps that allow you to add new features to your website.There are over 46,000 WordPress plugins available. Simply search for anyone that you want from the plugin section of your blog.
The plugins that every single blogger needs
While there are plenty of plugins that offer niche functionality, there are also certain types of plugins that pretty much every single blogger needs.
And if you want even more choice, we’ve created lists for many popular types of plugins:
- Backup plugins
- Page builder plugins
- Mailing list & opt-in form plugins
- Social media sharing plugins
- SEO plugins
- Contact form plugins
- Security plugins
- Performance plugins
- Analytics plugins
That should be enough to get you started!
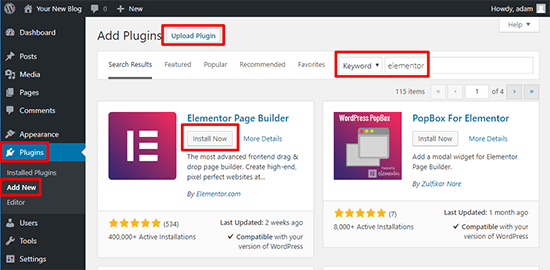
How to install WordPress plugins
To install WordPress plugins:
- Go to Plugins → Add New in your WordPress dashboard
- For free plugins you found at WordPress.org, search for the plugin by name and click Install Now
- For premium plugins, click Upload Plugin and upload the ZIP file
Once you install a plugin, make sure to Activate it. Then, you can read the plugin’s instructions for how to actually use the plugin on your site.
Step 6: Create some essential blog pages
Unlike a post, a “page” has no publish date. It’s just something that’s always there.
At a minimum, most blogs have pages for:
- About – This tells visitors what your blog is about, as well as a little more about yourself. You can see my About page here.
- Contact – A surprisingly large number of readers will want to contact you. Your contact page makes that happen. You can see my Contact page here.
You might have more information that you want to share – but those two pages provide a good baseline to give readers the information they need.
How to create a new page in WordPress
To create a new page:
- Go to Pages → Add New in your WordPress dashboard.
- Enter the title of your page in the top box.
- Enter the content using Gutenberg blocks by clicking the plus sign, alternatively you can paste your content in and Gutenberg will automatically convert it into blocks.
- Click Publish when you finish.
Step 7: Start getting traffic to your WordPress blog
At this point, you should have the basics down pretty well. You’ve knocked out the technical details and started creating content.
Once you start putting that content out there, you’re likely going to shift into the next phase of blogging where you start thinking:
“Hey, I’m putting all this content out there. Wouldn’t it be great if people were reading it?”
Well, this isn’t Field of Dreams.
If you build it, some people might come. But it’s probably going to take a bit more than that to actually get traffic.
So when you’re just getting started, how can you get traffic to your blog?
Here are two proven strategies:
- Learn the basics of SEO and apply them to your site. While you don’t need to become an expert, knowing these basics will make it a lot easier for your site to get found in search engines like Google.
- Register social media accounts and start promoting your blog on social media. Some social networks, like Pinterest, can be especially valuable for blogs.
Step 8. Mastering WordPress

You can learn more about WordPress through Youtube and Google. Simply search for any information you want and you will be able to read more and understand how to manage your WordPress blog.
Step 9: How to make money blogging
Finally, we come to the part of running a blog that many aspiring bloggers dream of:
Making money from your WordPress blog.
Now, I know that not everyone cares about making money blogging. But I think most people wouldn’t mind at least a little side income from their blog, right?
Thankfully, there are tons of different routes that you can use to monetize your blog.
Here are some of the most popular options:
#1 – Affiliate Marketing
Affiliate marketing is one way to make money from your blog. You can promote affiliate products on your blog. Affiliate marketing is a lucrative way to monetize your blog as you can create a passive income promoting a good product. A great tip to choosing the perfect product to promote is to promote genuine and quality product that is rare. Don’t just stick to one promote, promote more than one product. You should study how to become an affiliate marketer to learn more affiliate marketing tips. There are many products and services you can promote on your blog, a nice step to take is to visit ClickBank or Commission Junction, find and choose products related to your niche.
#2 – Flip Blogs
Flipping blogs is another great way to make money from your blog. This idea might require you to have a little technical background on web designing. This idea involves setting up a blog, increase traffic to the blog and put it up for sale. On average you can earn $150-200 flipping blogs. A good place to flip your blog is Flippa
#3 – Sell Your Own Product
You can also make money from your blog selling your own product. Selling your own product is not only lucrative but it gives you the freedom of mind. A great tip is to start selling from day one, don’t wait till you have that huge audience before selling your own product on your blog. You can easily create ebooks in PDF formats by using a Microsoft word or any other .doc text editor to create the contents of your eBook, afterwards convert it to a PDF file preferably with any of this tools. You can use Canva or MyeCoverMaker to create an eBook cover for your eBook.
#4 – Become A Blog Designer
Setting up blogs for individuals and business entities is a very lucrative way to monetize your blog. Like in the case of blog flipping, you will need some technical knowledge on web designing to be able to standout as a good blog designer. So many corporate bodies and individuals prefer the blogging platform. You can advertise this service on your blog homepage to your audience, use word of mouth advertising to tell friends and social groups about what you do.
#5 – Become A Freelancer
Yeah! You can make money from your blog as a freelancer. In this respect I mean offering service on short-term contracts. As a freelancer you should have a specified expertise. You can become a content marketer, learn more on how to create high quality content. You can also administer blogs for other bloggers. Bloggers who are part-time bloggers who run very tight schedule will need the help of a blog administrator to keep their audience engaged. There are lots of different freelance services you can offer on your blog. To become a freelancer visit Elance, Freelance to find a freelance job.
#6 – Sell Ads
Finally on my list is to sell ads on your blog. Publishing ads on your blog is one the most popular ways through which bloggers make money from their blog. There are many ads network you can publish ads for, but the most popular of this ad networks is the Google AdSense ad network. One prerequisite factor on which you can sell ads on your blog is that you must have the audience. If you don’t have the audience, then you can forget about selling ads on your blog as the conversion will be very low and thus low income . Here are some great tips on how to increase traffic to your website.
If you have the audience, then consider selling ads from third parties or create your own ads network if you have a very huge audience. One, the cons of selling ads on your blog is that the earning can be very low. In other words you will need high conversions to increase your earnings. To make money from Google AdSense is very reliable, but it depends on many factors, this include your preferred niche, the amount of traffic your blog attracts and the placement of your ads.
Google AdSense might not earn you as much as the methods mentioned above, but it’s still a very great way to earn passive income on your blog over a long period of time. You can sign up for Google AdSense by following the required processes. You should have a decent amount of traffic and a good number of original contents on your blog before applying for the program.
Conclusion
The fact remains that blogging is a very serious business. Once you put in the required effort, you will be able to make money from your blog. Gone are the days when you tell your family members or friends you intend to blog and they laugh it off . Thousands of bloggers across the world are earning decent income from their blogs on a monthly bases. You too can do same by following some of the methods outlined in this article.
But please remember:
It takes time, effort and money to make a business work. And it may require some experimentation to get right.
If you’re after a quick way to make some cash – blogging isn’t the answer.
How to start a WordPress blog – summary
You’ve made it to the end of this tutorial on how to start a blog. Awesome!
Once you understand how to start a blog you’ll start to evolve into using more advanced tactics to promote and monetize your WordPress blog.
But for now, congratulate yourself on a job well done because you had the gumption to do something awesome – start a blog!
Disclosure: This post contains affiliate links. This means I may make a small commission if you make a purchase.

Thanks for the detailed guide